Monday, July 12, 2010

Hartley House: Part 4 Finished Model

Below are photos of the finished 25mm Old Glory's Harwood House (MW-102), the residence and office of the town's mayor and physician, Doc Hartley. (In the second photo, you can see him defending his property from a bandito.)

All the building needs now are some interior details, which I'll add over time. As soon as my neighbor has some free time, we're going to make a base out of thin plywood for the building as well. This model needs a nice flower bed with a white picket fence.

I enjoyed the project, which really took only about a few mornings of labor. As I mentioned in the earlier post, I still would recommend spraying the building white instead of brushing it. This would have cut my work time significantly. Also, see my earlier posts on tips to make the roof fit the building and add how to add some fancy roof posts instead of the dowels that come with the kit.

Up next is one of Old Glory's modular Western buildings, one of their 'tent' buildings, a bridge, the finished OK Corral, and some out houses.

Friday, July 9, 2010

Navajo Rugs For Buildings

A cheap way to decorate the interior of any model building is to search the Internet for photos of rugs, paintings, drapes, signs, posters, and so on. Using a good photo program, resize them to the size you need and then print. I though I had a collection of Western rug images, but they must have died my hard drive last winter. A quick Google Images search this evening using "Navajo Rugs" called up enough images to keep me happy. This may sound like common sense, but make sure the images of anything you use are taken from the top down--angled images look odd once put on or in a building. Here are the results I found. Photos of the finished Harwood House (aka Hartley House) coming soon!

Thursday, July 8, 2010

Hartley House: Part 3 How Many Coats of White?!?

Another quick progress shot of the house from Old Glory taken at 10PM last night. Only the roof and two doors remain unfinished. The big lesson I learned is that if I ever paint another white building, I will spray prime it grey and then spray it white. That should save me tons of headaches. Painting a white building by brush is not fun!

I also learned to plan my colors ahead of time, even before I prime the models. Yes, an idealistic thought that I most likely will forget by morning.

Interior Paint
The interior is painted Americana Williamsburg Blue (DA040), one of their older colors. This is a great shade of blue, useful for buildings and figures. It thins well and covers black in one coat. Highly recommended.

BTW this afternoon I kept telling my wife that I was "painting the house" and had to get it finished. No time to talk. She didn't buy it. Though a couple weeks ago I actually did do some interior painting in our real house--really spruces up a place easily and cheaply! But I digress....

Tuesday, July 6, 2010

Hartley House: Part 2 Fresh Coat of Paint

Yesterday and today, I've been painting Old Glory's Harwood House from their OK Corral set. This is what it looked like at 10 AM this morning when I shot the photo--partially painted with lots more work to do. The last time I posted about the building (here), I had fixed the manufacturing problem of the sagging roof and had primed the building black.

My goal is to make the house look newer and belonging to Gun Town's leading citizen, physician, gunslinger, and mayor--Doc Hartley. (In real life, he is our neurologist and loves Westerns, decorating his office with cowboy paintings. I've also renamed this thread in honor of him.) I want the floor to look newer than my other buildings and have the outside painted a nice, new coat of white. Below you can find my paints and comments. I like to use my blog as my online painting notes.

Wasted Time Making Mistakes
As you can see, I have made my share of mistakes while painting. First, I painted the area grey where I wanted to paint white. That makes sense because white doesn't cover black very well. Plus a grey base makes white pop more. For some dumb reason, though, I figured I'd paint the inside trim white. I made that decision after trimming the walls black after having painted the floors. Then I decided that I was not being too smart and decided that the interior trim would just be the wall color, whatever I paint it. So I re-trimmed the trim black this morning. Just a bit of confused wasted time and effort! (I worked on the building to take my mind off my dad being in the hospital, so my mind wasn't totally on my modeling.)

Paints For Newer Floor Look:
1. Americana Honey Brown (DA163)--a nice color but a bit thin. Not that good for figures but ok for buildings. Heavily "wet" drybrushed over black primer.

2. Americana Fawn (242) lightened with Ceramcoat Ivory (2036). Ivory was on my table, so I used it. Made the Fawn look lighter and warmer than just adding white. Fawn is a basic craft paint everyone should have. No idea how Ivory paints on its own--I just bought the bottle yesterday morning. Drybrushed.

3. Ceramcoat Ivory as highlight. Very light drybrush along edges.

Grey Base:
Americana Grey Sky (DA111). One of the best-coating grey craft paints. Very light but covers in one coat.

White Walls:
Americana White Wash (DA02). Just a bit more washed out than regular white. Thinner than I like. OK for buildings. Needs two coats at least.

Hopefully, I'll work on this some more on this building this afternoon.

Monday, July 5, 2010

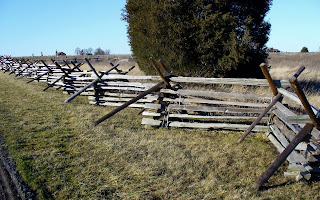
Gettysburg: Fences

This week, I'll be posting the rest of my Gettysburg photos from Christmas 2008. I thought I had posted these earlier. Today's theme is fences. Jeremy snapped these for me so we have a reference for modeling them.

Sunday, July 4, 2010

Splintered Light: Pride of Lions

The last series of photos from the Pride of Lions demo game at Cold Wars 2010. You can see my earlier post on my Orcs & Goblins for more pics from the game. Jeremy and I only played a few turns before having to return home that evening to see my dad. The fellows were very understanding. Dave McBride and Rebel Mike graciously took our places. OK, let's get into the pics and the game. Captions are below each photo.

Photo 1: Here you can see my right right hand side of the table. Not much going on. We were just getting ready to deploy our forces. I liked the small 'islands' of scenery and want to use the same idea for my games. The rivers looked great as well. I learned it doesn't take a lot of work to make a good looking game table.


Photo 2: We played with six players. John McBride, author of Pride of Lions, had several armies prepared and let us choose and then deploy as we desired. Deployment is hidden, hence the cards some of which were 'dummies.' Picking and deploying sucked up a lot of time, followed by a rules summary. Though I'm a con newbie, I suggest game masters have the forces pre-assigned to each player and deployed ahead of time, maybe giving us a few options of placing a unit or two. This really speeds up a demo game when most of us have no idea what we are doing. Also, we had so many units in play all we could do is plow straight ahead. Maybe smaller armies or wings of a single army might be better? All lessons I learned if I ever run a mass combat game at a con. Still, I love John McBride and had a lot of fun regardless!


Photo 3: Jeremy (aka Rover Dill) played to my left. I was in the center. And another fellow played to my right. We each had a different army. I played Orcs & Goblins, Jeremy played Dwarves (the original smaller dwarves, not the larger Druid's Children dwarves), and the fellow on my right played the Leonines army. Here you see some of his cavalry. (Sorry, but I can't remember anyone's names!) Terror Birds lead the unit followed by Hunting Cat cavalry. Neat stuff!


Photo 4: Jeremy's army on my left. The stubborn dwarves, commanded by Jeremy, hold the left flank. Little did we know that Jeremy's was about to unleash his 'blitzkrieg' strategy using dwarves.


Photo 5: Jeremy is about to kick off his blitzkrieg attack with his Dice Roll of Doom! He plowed into the enemy and got amazingly lucky with his dice rolls, sending the enemy reeling. John McBride, in the overalls, looks on in anticipation.


Photo 6: John gives Jeremy some more advice on how to follow up his charge of doom. As you can see, my orc force in the lower right was having some 'issues' with getting the lead out, preferring the let everyone else plow ahead while they watched. Lazy bums! Ok, so I kept blowing my command rolls and having people clobber me with 'slow' spells.

We had a lot of fun playing with great miniatures and nice fellows. I haven't said a lot about the rules because I was having some trouble keeping focused (nothing new there!) and was a bit overwhelmed by it all. I've tried focusing more on the miniatures. If you like them, be sure to take advantage of Splintered Light's 20% off sale until the end of July.

Update On My Dad
My dad is doing well after the surgery. A couple days ago he left ICU and is in a step down unit--Jefferson's old ICU. He'll be there awhile yet. Still a couple more weeks in the hospital. The new liver seems to be doing well. All is going great. Thanks for your continued prayers!